Thursday 23 January 2014

CAP: Semester 2 Mission Statement...? #1

100 Low Poly Assets Challenge...


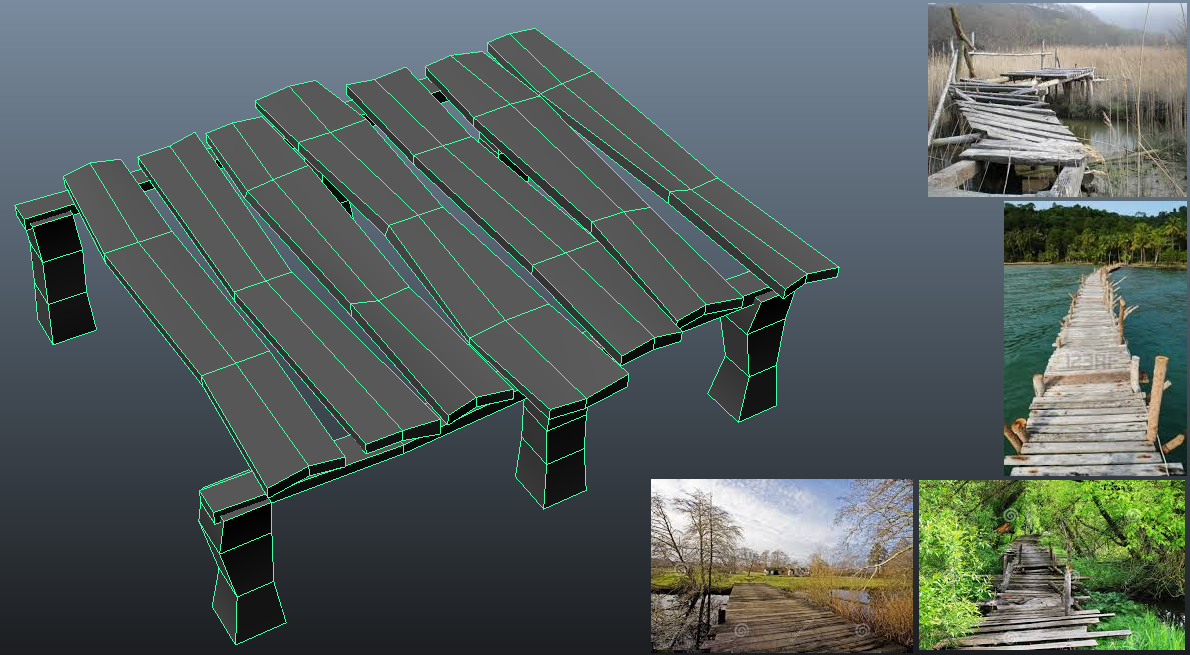
As the subtitle suggests, I'm considering a project where by I focus on creating 100 modelled assets for a game level - most likely for the UDK game engine. If time permits, I may also block out the actual environment for the assets but in a modular fashion.

Having selected the environment modelling brief last semester, I learned a lot more about modelling, UV mapping and texturing. However, I never had much of a chance to really explore the texturing side of things in full detail.

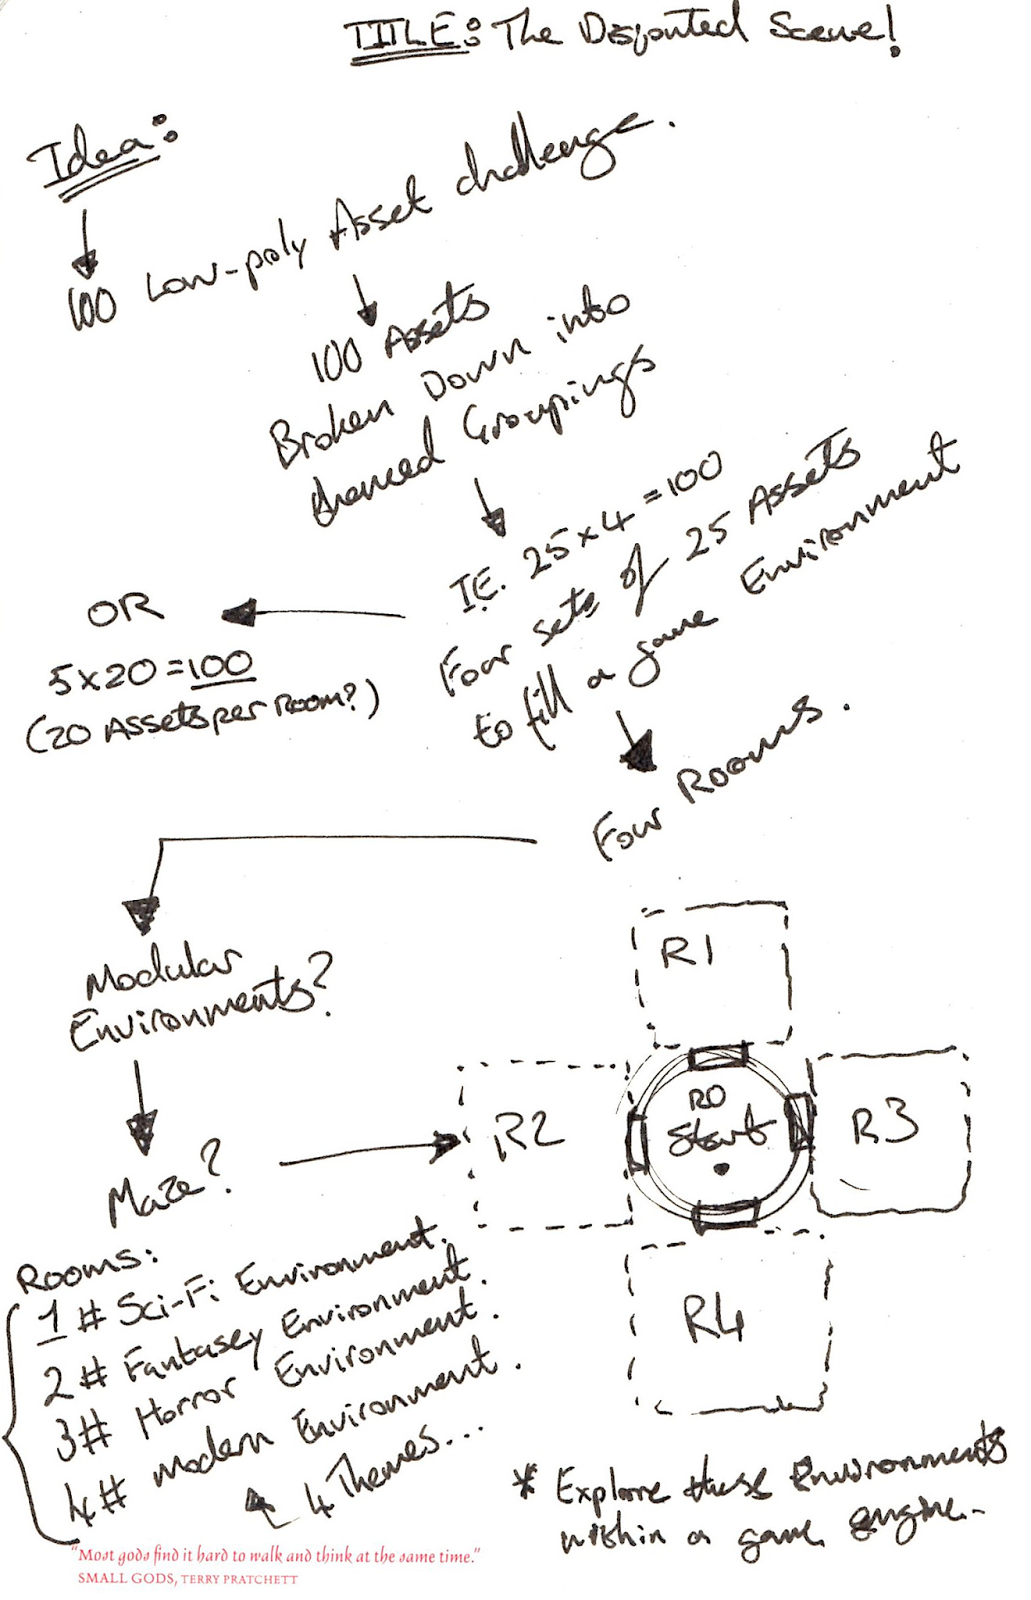
I figure that by turning the 'make your own brief' into something more akin to an actual challenge. I can really test myself and my abilities. Moreover, I hope that by continuously modelling, UV'ing and Texturing a dozen low-poly game assets, I can further improve through the notion of repetition in order to improve my skill set. Further more to that, I hope to push myself enough to be able to complete the challenge and progress it into a game engine (UDK) as a stretch goal.

I reckon that by attaching a theme/or/themes to the challenge (possibly breaking down the 100 assets into smaller themed groupings), I will be able to set myself an ultimate goal that is substantial enough to be considered worthwhile and viable as an approach to my continual skill building.

Till next time...


Wednesday 15 January 2014

Final Stages... #20

Nearing the End...

The finished Environment sample, complete with full UV Maps. Along with a example of my asset list to keep track of what I've modelled and mapped out. As an added bonus, an image of the full UV set for the 3D Environment Sample...

[ Light Test... ]


Tuesday 14 January 2014

Environment Building Continued... #19

More Modelling...

As the 3D Environment Sample comes together, I continue to UV map as I go along to keep things straight forward and hassle free when the real texturing beings.


As you can also see, as the scene progresses even more I start to Dress the Set...


From Concept to Creation... #18

Continuing the process...

After exploring different modelling, UV and Texturing processes. I continued to flesh out the concept and start building more of the 3D Environment Sample. The metal sign attached to the wall was mostly created using simple polygon modelling, however, for the fancy metal swirl I used the CV Curve tool to extrude a flat polygon plane along the curve to create the final product.

I then moved on to create a simple wooden box and barrel, along with a basic wooden plank and a wooden shield. As for the wall I'm thinking something along the lines of a sandstone effect to keep in line with the initial concept art piece.

The steps will probably be made of stone.


UV Mapping as it happens...
UV Mapping the scene as it progresses, to ensure a streamlined process towards the end of the building process and an eased transition into the Texturing stage of the project.


Sunday 12 January 2014

Modular Design... #17

Modular Bridge Prop...

With this 3D prop, I decided it would be best to use a modular design. This time I also forgone the usual concept art as a test, using previous thumbnail environment concept art and focused more on using reference images only to produce the bridge - This being a slightly different but mostly very similar to the technique of  using concept art and reference to build assets for a scene/game.


Modular Bridge Section Repeated.

This youtube video gives a great explanation about resolution of texture maps when using a modular design approach as opposed to creating the bridge above as a single model and trying to fit the large amount of individual pieces that make up the whole sum of the bridge.


So in essence, by using a modular design with the bridge. I will be able to increase the resolution of the actual textures for it and thus come away with a texture map that will contain a lot more detail and less pixelation, compared to other assets/props within my 3D Environment Sample.


Saturday 11 January 2014

Spaming the 3D Props... #16

The Wooden Shelf...
Yet again, I followed the same principle of using concept art and reference images to produce this piece.


The next stage would be to UV map this prop then Texture it for use in the 3D Environment scene.


Friday 10 January 2014

Modelling Props! #15

Another 3D Prop...

Flowing the same principles of modelling using Concept Art and Refrenece images, then UV'ing the prop in a specific yet simple way. I created the following Wooden Cart Model for the 3D Environment scene with the intent on focusing on the outer part of the environment idea, while still letting me explore slightly more advanced modelling techniques.


A Simple Start... #14

The 3D Box of Doom...

Having established that its not worth modelling anything in 3D unless you have a solid piece of concept art and reference images. I started with that exact topic, nothing fancy, just simple and rough.


Starting with a rather simple prop, a wooden crate, I took a little time to look into techniques for Modelling and UVing as well as Texturing for 3D. Everything from maximising texture space on the UV maps to similar objects' UV's occupying the same Texture space. All these little tips built up and combined to make for a more smooth and much improved working process.

I feel that the advice to always use concept art and reference images is key to making a great prop.


Although the Wooden Crates UV Map looks very basic, you can see from the Textured Crate image that the verity in the three Wooden Crates is evident, not just a repeat pattern although they all use the exact same UV and Texture Map.


Final Environment Concept Art... #13

A Finilized-ish Environment Perspective Drawing...

This time I refined the last drawing I did and improved the perspective too. I'm pretty happy with this concept and think its about time I moved over to the 3D Modelling stage next.


Again I used bleed proof paper, along with the 0.3mm Fineliner, a Copic T1 Tonal Grey and a Pro-marker in Blue.


Thursday 9 January 2014

More Concept Art... #12

An Environment Perspective Drawing...

Here I use bleed proof paper again, along with a 0.3mm Fineliner, a Copic T1 Tonal Grey and a Pro-marker in Blue - because Copic Markers are so damned expensive! - The prespective is a little messed up, but its been a while since my Graphic Comm classes back in High School, just imagine, I actually achieved a Higher in that subject too!

Moving towards a slightly more outdoor-ish concept, yet still contained within an inner building. Here I decided to incorporate the water element that I previously thought about. The thinking behind this being that I could model an interior environment and give it a frontage for added detail.


Concept Art... In Colour... #11

Some more Concept Art...

Following on from my last blog post on thumbnails, here I have gone into a little more detail. Exploring a bunch of different things all within a few drawings. Everything from a Medevil type concept, a Hobbit style storage room and a slightly wired mystic/magic shrine type concept.


Towards the end of these drawings I have started to integrate an element of water in the scenes. At this stage I quite like the idea of having some form of water feature or something in my 3D Environment Scene - not entirely sure right now though.


Wednesday 8 January 2014

Initial Environment Concepts... #10

Environment Thumbnails...

Well, some of these are a touch bigger than thumbnail size, but its the thought that counts. I wasn't as interested about how big the doodles where as opposed to the actual drawings themselves.

Here, I use bleed-proof paper and a mixture of black marker and fine liner...

I was quite surprised when I sat down and started to draw these concepts out on paper. At the time it had been quite a while since I last put pen/pencil to paper - it was a rather bad phase, and it shows in the first image (top-right).

However as I tried to wrack my brains and scribbled away, it all started to come back to me and by the end of the first sheet of paper I was starting to get the hang of drawing again.


There was a slight focus on Temples and Magic... can you tell?


Game Props... More Research... #9

Game Props and Assets...

A dive into the topic of Prop and Asset creation threw up some real gold nuggets and some great advice for a budding 3D Artist.

One piece of pure gold that I stumbled upon was the direct link between the Props Concept Art and the Modelling of the Prop. I found a huge amount of advice on forums such as polycount.

But the one single piece of information I came away with was the very important need to have concept art or reference images to work form. It may seem like a totally obvious statement, but seeing a model made from memory vs one constructed from both memory and concept art/reference images is just huge... a bit of a slap in the face.

^ A great example of the vast amount of game props and assets that it takes to fill a game or feature film animation.


^ A GREAT video from Carbine Studio on the topic of Prop and Asset Creation for Games! (Youtube really does have some real golden nuggets hidden amongst all that poor quality trash.) This is a must watch, it really is an inspiring insight into the role of a Prop Artist in the Games Industry... up until the bit near the end which is in the form of a blooper ending. Hearing that last bit could be a bit soul crushing...


Tuesday 7 January 2014

Mood Boards... Continued... Continued... #8

Again with the Mood Boards...?A little foray into the land of Textures... and by foray I mean a mooch around google images searching for realistic textures that one might find in the likes of the initial Concept Art image provided in the Project Brief.

Realistic Textures...

Hand Painted Textures...

I also decided to explore hand painted textures too. This may or may not be of relevance to the project but it is still a worth while exploration of textures as I do have a slightly more bias interest in the more less real realities.

I like the fact that a lot of games strive for realism and that's great, it works well for the games that do go down that path, but I tend to think that things like 3D Animation shouldn't be about realism, that's what video cameras and live action are for.

I just happen to slightly suck at Digital Painting... which is a bit of a problem and something I really need to (and want to) investigate more. However, this project is more about the 3D Environment Sample rather than Digital Painting... Perhaps in the future when I have more time.

*Sighs*


A Touch of Set Dressing Research... #7

Set Dressing... A little peek...

The first youtube video I found that's really interesting is a bit of a behind the scenes look at the Animated Movie 'Planet 51' - If you haven't already seen it, why are you still here? Go watch it! - Its not exactly a focused video on set dressing (unlike the second youtube video) but its a great example (the top-right corner shot) of what Set Dressing does, which is to flesh out an Environment.

Keeping in mind, that although this is a behind the scenes look at an Animated film, its still relevant to an extent in terms of Set Dressing for an Environment Sample.


This second youtube video is a little more along the lines of in-depth Set Dressing. While it might be shown in terms of Autodesk 3ds max, its still very relevant to the topic at hand - as one 3D software package is pretty much the same as the next, but with slight differences. All the actual theory remains virtually the same...


Monday 6 January 2014

Mood Boards... Continued... #6

What!? Again? Ok...

Here are some more mood boards I've put together, this time focusing on a slightly different topic from the last lot of mood boards, which focused primarily on actual mood. As you can see below, I chose to focus on the style more this time round with a slight touch of divergence into Interiors.


As you can probably tell, at this point I'm thinking more 'inside' in terms of modelling a 3D Environment Sample. I sort of like the idea of focusing more on the topic of modelling, and I think by choosing to look at interiors, I'd have a much more varied and rich subject area.

It could be said that rather than Environment modelling its more akin to Set Dressing...


Mood boards... #5

Moody Mood boards...
Some initial mood boards to help get a feel for the project and the type of style and art direction that I am aiming  to achieve through the process of this project.


I decided to go with a mixture of dark and light, each image on these mood boards reflects this pretty well in my opinion, while still keeping to the general type of style as the initial concept piece provided in the project brief.


Friday 3 January 2014

Getting Started - Project Mode Engaged! #4


 Starting the Project...
To start with I jotted down the module requirements and project requirements and a little doodle or two to get my brain in gear.

Nothing entirely interesting but its a start...

[ Mind-Map... ]
The module also requires a project pipe line plan as would be the case in an industry environment for any creative project.

[ Rough Pipleline Plan... ]
So I started to jot down a rough plan for the process that would most likely be used during the process through to completion. (Click to enlarge Images). As well as the overall project pipeline rough, I added a smaller pipeline for the actual modelling part as a separate process within the overall project planing.

I also started a mind-map to get ideas flowing...


Maya Keyboard Shortcuts - The Cheat Sheet! #3

Cheat sheets for Maya!

Well its not really cheating, but these are very useful sheets to print and keep handy when working within Maya. If your like me and tend to forget the vast amount of keyboard shortcuts available across a wide range of creative software, these can be extremely useful and quick to refer to if you have them sitting close at hand.

I would recommend these links...
Shortcutmania.com: Maya Keyboard Shortcuts. (printable version).
DigitalArtsGuild.com: Maya Cheat Sheet. (pdf. version).


Thursday 2 January 2014

The Relationship between Maya and UDK... #2

Maya and Game engines...

Although the technical information provided for the module submission along with the project brief states the final 3D Environment sample does not have to reach a game engine. It's still prudent for research purposes to investigate this relationship a little further.

As for the game engine in question, UDK was chosen as the game engine to investigate.

When modelling environments and objects/assets/props (or what ever you want to call it), its important to make sure that the Maya grid will match that of UDK. As importing models from maya into UDK may cause problems if the scale and proportion ratio isn't 1:1 [1 Maya Unit = 1 Unreal Unit 'uu'].

It might also be important to note that when importing objects from maya into the game engine (UDK), that it uses the origin point of the maya grid as a reference point when importing into UDK. So its always best to centre objects modelled in Maya to the origin point on the grid as seen in the image below.

Character Size Measurements:
[ UDK Character Size. ]
First before going straight to modelling in Maya, the grid system in Maya also has to be changed to match that of the UDK grid system. To set up the grid in Maya, go to:

Display ---> Grid Options.

When the Grid Options window pops up on your screen, you need to change the 'Length and Width', 'Grid lines every' and the 'Subdivisions' settings in the 'Size' tab. This will ensure Maya's grid units = 16uu in UDK.

Length/Width: 512
Grid Lines Every: 512
Subdivisions: 32


Wednesday 1 January 2014

Computer Arts Practise - Project Brief #1

Project Brief:
Produce and develop a professional 3D environment sample suitable for a computer game engine.

Brief Digest:
The Client is developing a new game concept for to be presented to a publisher in the near future. They have commissioned you (the Artist) to mock up an environment sample from one of the concept art pieces they have provided.

You are to research, conceive and develop a professional quality 3D environment sample suitable for a game engine.

The Initial Concept Art:
[ By: Noah Bradley. ]

Similarities:
[ By: Noah Bradley. ]
[ By: Noah Bradley. ]
- Having a quick look up of Noah Bradley's on google, I found his own personal site. A quick skim through the site produced some more Concept Art by Bradley that had a similar look and style as that of the Initial Concept Art provided in the Brief. An excellent start to the project as it provides more insight into the original concept and a strong starting point for the project.